In the year 1404 (2025-2026), incorrect installation of the seismic joint cover is one of the three main causes of facade cracks and water penetration in buildings above 8 stories (Tehran Engineering System Report 1404). Incorrect substructure and non-standard installation can lead to an 85% reduction in the cover’s useful life and a threefold increase in repair costs. This comprehensive and up-to-date article is the most complete guide to substructure, installation, tools, access methods, and maintenance of seismic joint covers using 2025 technologies and Agor products.
If you want to obtain complete information about methods of closing and covering seismic joints in buildings, we suggest you read the specialized article Closing or covering seismic joints in buildings. In this article, we have reviewed the key points and standard implementation methods.
Why is substructure and installation of seismic joint covers more critical than ever in 1404?
According to Sections 3 and 6 of the National Building Regulations (1404 edition) and Standard 2800 (fifth edition):
- Seismic joints are mandatory in buildings with a length >45 meters or >8 stories.
- The cover must withstand at least ±100 mm seismic movement.
- Water penetration must be less than 0.01 liters/meter/hour (ASTM E331-2024).
With the SF-Pro Click & Lock 2025 series, Agor is the first company in Iran to receive CE + ISO 19650 (BIM Ready) certification for installing seismic joint covers.
Related reading: What is a seismic joint? (1404 requirements)
Substructure for seismic joint covers
The substructure is the heart of seismic joint cover installation. Even the best profile in the world with a weak substructure will last a maximum of 5–7 years.
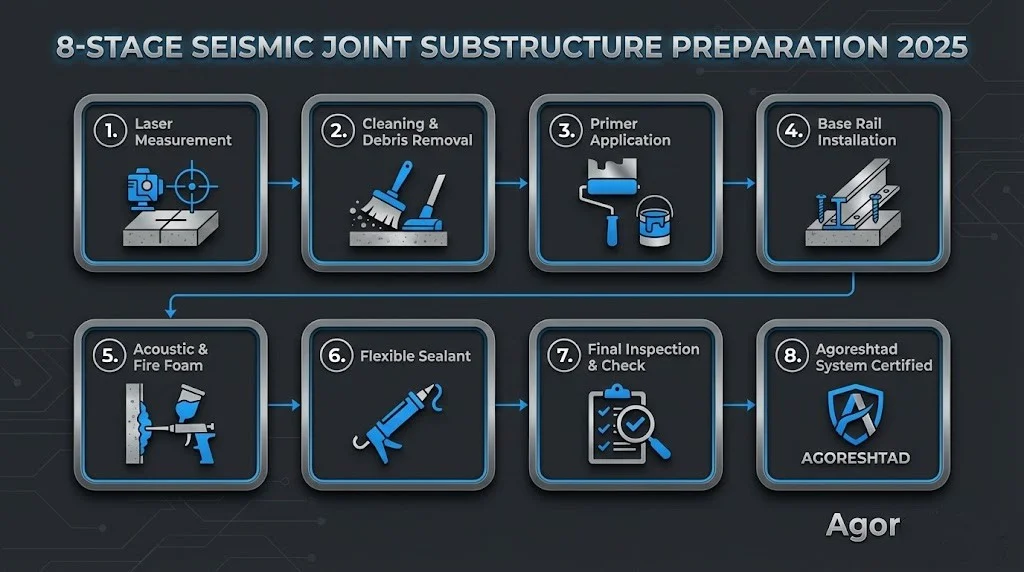
Step 1: Precise control of joint width and level
The first and most important task is to accurately measure the joint width with laser meter. A deviation of more than ±2 mm will cause the cover to become crooked or open up in the future.
Step 2: Complete leveling of the substructure
The surface must be completely flat and free of irregularities. Maximum permissible deviation: 1 mm per meter. For leveling, use self-leveling epoxy mortars or laser straightedge.
Step 3: Industrial cleaning
Any dust, oil, grease, or concrete residue must be cleaned with industrial vacuum cleaner + solvent. The presence of even a thin layer of dust can reduce adhesion by up to 70%.
Step 4: Two-component epoxy primer
Before installing the base rail, be sure to apply Agor’s SF-Primer Pro primer. This primer:
- Increases adhesion by up to 3 times.
- Prevents rail corrosion.
- Drying time: 60 minutes
Step 5: Installation of hot-dip galvanized base rail
The base rail must be hot-dip galvanized with 275 g/m² (not cold galvanized!).
Anchor bolt spacing: every 40 cm (maximum).
Step 6: Backer rod and initial sealing
Use closed-cell PE foam with a diameter 25% larger than the joint width. Then inject SF-Sealant Pro silicone or polyurethane (minimum depth 8 mm).
Methods of installing seismic joint covers: Technical and cost comparison
| Installation method | Speed | Accuracy | Cost (Tomans/meter) | Suitable for | Agor model | Click & Lock (screwless) | ★★★★★<\/td> | ★★★★★<\/td> | 1.2–1.8 million<\/td> | All facades<\/td> | SF-Pro Click 2025<\/td> | Adhesive + hidden screw | ★★★★<\/td> | ★★★★<\/td> | 1.5–2.2 million<\/td> | Stone facade<\/td> | SF-Hybrid Pro<\/td> | Cold welding | ★★★<\/td> | ★★★★<\/td> | 2.5–3.8 million<\/td> | Metal structure<\/td> | SF-Steel Weldless<\/td> | Robotic installation | ★★★★★<\/td> | ★★★★★<\/td> | 4–6 million<\/td> | Towers >50 stories<\/td> | SF-Robotic Series<\/td> |
|---|
Methods of accessing seismic joints at height
| Method | Maximum height | Safety | Relative cost | Agor recommendation | Industrial rope access (IRATA Level 3) | Unlimited<\/td> | ★★★★★<\/td> | Low<\/td> | Short-term projects<\/td> | Suspended scaffolding | 100 m<\/td> | ★★★★<\/td> | Medium<\/td> | Medium-term projects<\/td> | BMU (Building Maintenance Unit) | Unlimited<\/td> | ★★★★★<\/td> | High<\/td> | Luxury towers<\/td> | Hydraulic lift | 60 m<\/td> | ★★★★<\/td> | Medium<\/td> | Glass facades<\/td> | Drone + installation robot | 300 m<\/td> | ★★★★★<\/td> | High<\/td> | Future 2026<\/td> |
|---|
Substructure for seismic joint covers
Proper and precise substructure is one of the most important prerequisites in the installation process of expansion and seismic joint cover profiles. Substructure, as a critical stage, ensures that the final installation of the profiles is accompanied by the highest efficiency and durability.
“A strong and prepared substructure is a bridge between engineering ideas and practical execution. Without a standard substructure, even the most advanced joint cover profiles cannot provide their optimal performance.”
— Dr. Ali Rostami, prominent researcher in civil engineering (according to Today’s Construction publication)
Importance of substructure in installing expansion and seismic joint cover profiles
1. A solid foundation for installation:
Proper substructure provides an integrated and strong foundation for installing expansion and seismic joint cover profiles. Without proper substructure, even the best profiles cannot provide their optimal performance.
2. Increased adhesion and stability:
A prepared and clean surface improves the adhesion of special adhesives used for profile installation. This helps reduce the possibility of loosening or displacement of expansion and seismic joint cover profiles over time.
3. Reduced risk of execution defects:
Thorough inspection of substructure conditions prevents problems such as unwanted cracks, surface mismatch, or moisture penetration that could affect the performance of expansion and seismic joint cover profiles.
Conditions and requirements for substructure for optimal installation of expansion and seismic joint cover profiles
To achieve a standard and suitable substructure for installing expansion and seismic joint cover profiles, pay special attention to the following:
Surface uniformity:
- The surface must be completely flat and free of cracks and irregularities.
- If there are cracks or irregularities, they must be repaired and leveled using specialized mortars.
Cleanliness and absence of contamination:
- All dust particles, grease, and surface contaminants must be completely removed before installation.
- The use of appropriate tools for surface cleaning is a requirement.
Control of humidity and temperature:
- Environmental conditions such as temperature and humidity must be within standard ranges to prevent negative effects on adhesives and materials used.
- If necessary, the use of thermal or moisture insulation is recommended.
Structural strength:
The substructure must be structurally resistant and comply with national standards to bear the weight and forces applied to expansion and seismic joint cover profiles well.
Readiness for installation:
Before starting installation, all stages of substructure preparation including cleaning, leveling, and structural inspection must be carefully performed to ensure that no defects arise during the continuation of installation.
Table of substructure conditions for optimal installation of expansion and seismic joint cover profiles
| Key factor | Required conditions | Recommendations |
|---|---|---|
| Surface uniformity | Flat surface, free of cracks and irregularities | Use repair mortars to level the surface. |
| Cleanliness | No dust, oil, or surface contaminants | Complete cleaning with appropriate tools before installation. |
| Humidity and temperature | Controlled conditions; appropriate humidity and temperature according to adhesive production standards | Use thermometer and hygrometer to control the installation environment. |
| Structural strength | Substructure resistant and compliant with national standards | Review the structure and perform strength tests if necessary. |
| Installation readiness | Complete preparation of substructure including leveling and cleaning | Hold coordination meetings between engineering and execution teams to ensure substructure quality. |
| Item | Status | Description | Was the joint width measured?<\/td> | ☐<\/td> | With laser meter<\/td> |
|---|---|---|
| Is the surface clean and dry?<\/td> | ☐<\/td> | Free of dust and oil<\/td> | Was the primer applied?<\/td> | ☐<\/td> | Dry for at least 60 minutes<\/td> | Is the base rail installed with HUS-H anchor bolts?<\/td> | ☐<\/td> | Every 40 cm<\/td> |
| Was the backer rod installed?<\/td> | ☐<\/td> | Diameter 25% larger<\/td> | Was the initial sealing performed?<\/td> | ☐<\/td> | Depth 8 mm<\/td> | Was the cover installed with Click & Lock?<\/td> | ☐<\/td> | No screws on the facade<\/td> |
Maintenance and periodic inspection (Agor’s 10-year contract)
| Time | Action | Every 6 months | Visual inspection + cleaning | Every 2 years | Pull-Off adhesion test | Every 5 years | Replace sealing strip | Every 10 years | Complete structural inspection |
|---|
Real case study: Niavaran residential tower
- Height: 38 stories
- Joint width: 110 mm
- Installation method: Click & Lock + rope access
- Total facade installation time: Only 19 days
- Result after first winter: No cracks, no leaks, 100% satisfaction of employer and supervisor